There’s no need to go out and buy an archery target stand when you can simply build your own with regular materials and simple tools. In this guide, we’ll show you a step-by-step process to make a long-lasting DIY target stand.
Materials you’ll need
To begin, there are the materials you’ll need to bring your ideal archery target stand to life. These materials are:
- PVC pipes/wood. These are to make the stand frame itself.
- Hooks to hang your target.
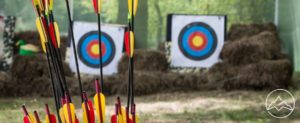
- Your target itself. It’s often best to get a target made out of some cushioned material that won’t break permanently upon being shot.
When selecting the PVC pipes or wood, it’s important to make sure that you can reasonably fit them together or otherwise attach them neatly. This is because your archery target will be suspended from the ground, rather than resting passively upon it. This keeps the target from being harmed by bad weather and more accurately simulates shooting a target at your chest level.
With a suspended stand, you can take to your target range any time, even if it rained the night before.
Tools
There are also a handful of tools that you’ll need to put all of this together. Thankfully, they’re really common tools you should already have as part of a standard toolkit. They are:
- A hammer
- Duct tape
Seems simple, right? But the best DIY projects often are.
The hammer will be used to put the wood frame together or help solidify the locking of the PVC pipes. Duct tape is a precautionary tool that you might use to secure the hooks that will hang from the top of the stand.
Like what you see? Check out our top picks for the best hunting boots.
The DIY target stand process
Now that you’ve collected the necessary tools and materials, it’s time to begin. Follow each of these steps closely to ensure proper completion of the archery stand to get in your practice time before heading out on your next bowhunting trip.
Step one
First, you’ll need to construct the frame. This will be accomplished by using either the PVC pipes or the wood planks that you gathered earlier.
The general shape to start with will be a square that lies flat on the ground. This is the primary base of the frame and will ensure plenty of stability during inclement weather, wind, or the force of your arrows as they hit your target.
Next, use two taller pieces of PVC pipe or wood and place them on opposite sides of one side of the square, pointing upward toward the sky. Use a smaller piece to complete the rectangular section.
Finally, use two more sections of PVC pipe or wood to add diagonal lengths to the taller pieces. Then connect these diagonal lengths to the original flat base square. This will help stabilize the taller section and prevent it from bending when it receives an impact.
Step two
The next step involves attaching hooks to the top of the rectangular section. If you’ve done this correctly, you’ll see that there’s a perfect negative space inside the rectangle that’s optimal for placing your hanging target.
Set the hooks on the PVC pipe or wood plank that forms the top of the rectangle. These hooks can be secured with duct tape if they require additional support.
Step three
The next step involves hanging your chosen target from those hooks. Choosing the right target is key, since something too heavy might still topple the archery stand and won’t be usable for actual arrow practice.
You’ll need to find a target that’s soft enough to take a hit while still being light enough to be suspended from the hooks that you placed during the last step. This might take a little bit of trial and error, but we’d recommend using a sack that is filled with feathers, cotton, or similar material as your target (these are commonly known as a bag target.)
Be sure to test your target by hanging it from the hooks and hitting it with an arrow or a baseball. This will simulate the force that’s going to be placed on it when you actually use it for target practice shortly. If the sack doesn’t cause the whole stand to fall back, then you’ve done a great job.
You can also purchase a premade shooting target that’s designed to hang from these kinds of stands. This might be a good choice if you don’t have any experience making your sacks or lack the materials. Paper targets would require you to add a backstop to the frame. If you’re using wood – this might be a fine option but isn’t all that easy when using PVC. If you’re comfortable with woodworking, feel free to go that route for your homemade archery target.
Step four
Finally, all you need to do is paint your shooting target with the right symbols or markings, so you have different spots to aim for during your practice. If you purchased a target that already has these symbols painted on the surface, then you can safely skip this step. Once done, set the target up in your shooting range, grab your favorite archery bow, and get to practicing!
FAQs about How to Build an Archery Target Stand
What materials are needed to construct an archery target stand?
How do I make sure the target stand is stable and secure?
What safety considerations should be kept in mind when building an archery target stand?
How long does it typically take to build an archery target stand?
Are there any tips or tricks that will help me build a better archery target stand?
Conclusion
As you can see, putting together your own DIY archery target stand isn’t as hard as you might think. Doing it yourself can save you some money, and it might even be faster than ordering one online. Thanks for reading!